Welcome to Rusty Engine!
Rusty Engine is a simple, 2D game engine for those who are learning Rust. Create simple game prototypes using straightforward Rust code without needing to learning difficult game engine concepts! It works on macOS, Linux, and Windows. Rusty Engine is a simplification wrapper over Bevy, which I encourage you to use directly for more serious game engine needs.
The following courses currently use Rusty Engine in their curriculum:
- Ultimate Rust 2: Intermediate Concepts (the sequel to Ultimate Rust Crash Course)
Tutorial
This tutorial will walk you through all the major features of the engine. For more details, see also:
Quick Start Example
- Create a new Rust project and run
cargo add rusty_engineto add Rusty Engine as a dependency (see the Configuration page for more details). YourCargo.tomlfile should end up with a line similar to this:
# In your [dependencies] section of Cargo.toml
rusty_engine = "7.0.0"
- Download the Asset Pack to your project (see the Asset Pack page for more details).
curl -L https://github.com/CleanCut/rusty_engine/archive/refs/heads/main.tar.gz | tar -zxv --strip-components=1 rusty_engine-main/assets
- Write your game:
// in src/main.rs
use rusty_engine::prelude::*;
// Define a struct to hold custom data for your game. If you don't yet know what data fields you
// need, it can be an empty struct. It must have `#[derive(Resource)]` on the line before it.
#[derive(Resource)]
struct GameState {
health: i32, // add any fields you want, or leave the struct without fields
}
fn main() {
// Create a game
let mut game = Game::new();
// Set up your game. `Game` exposes all of the methods and fields of `Engine`
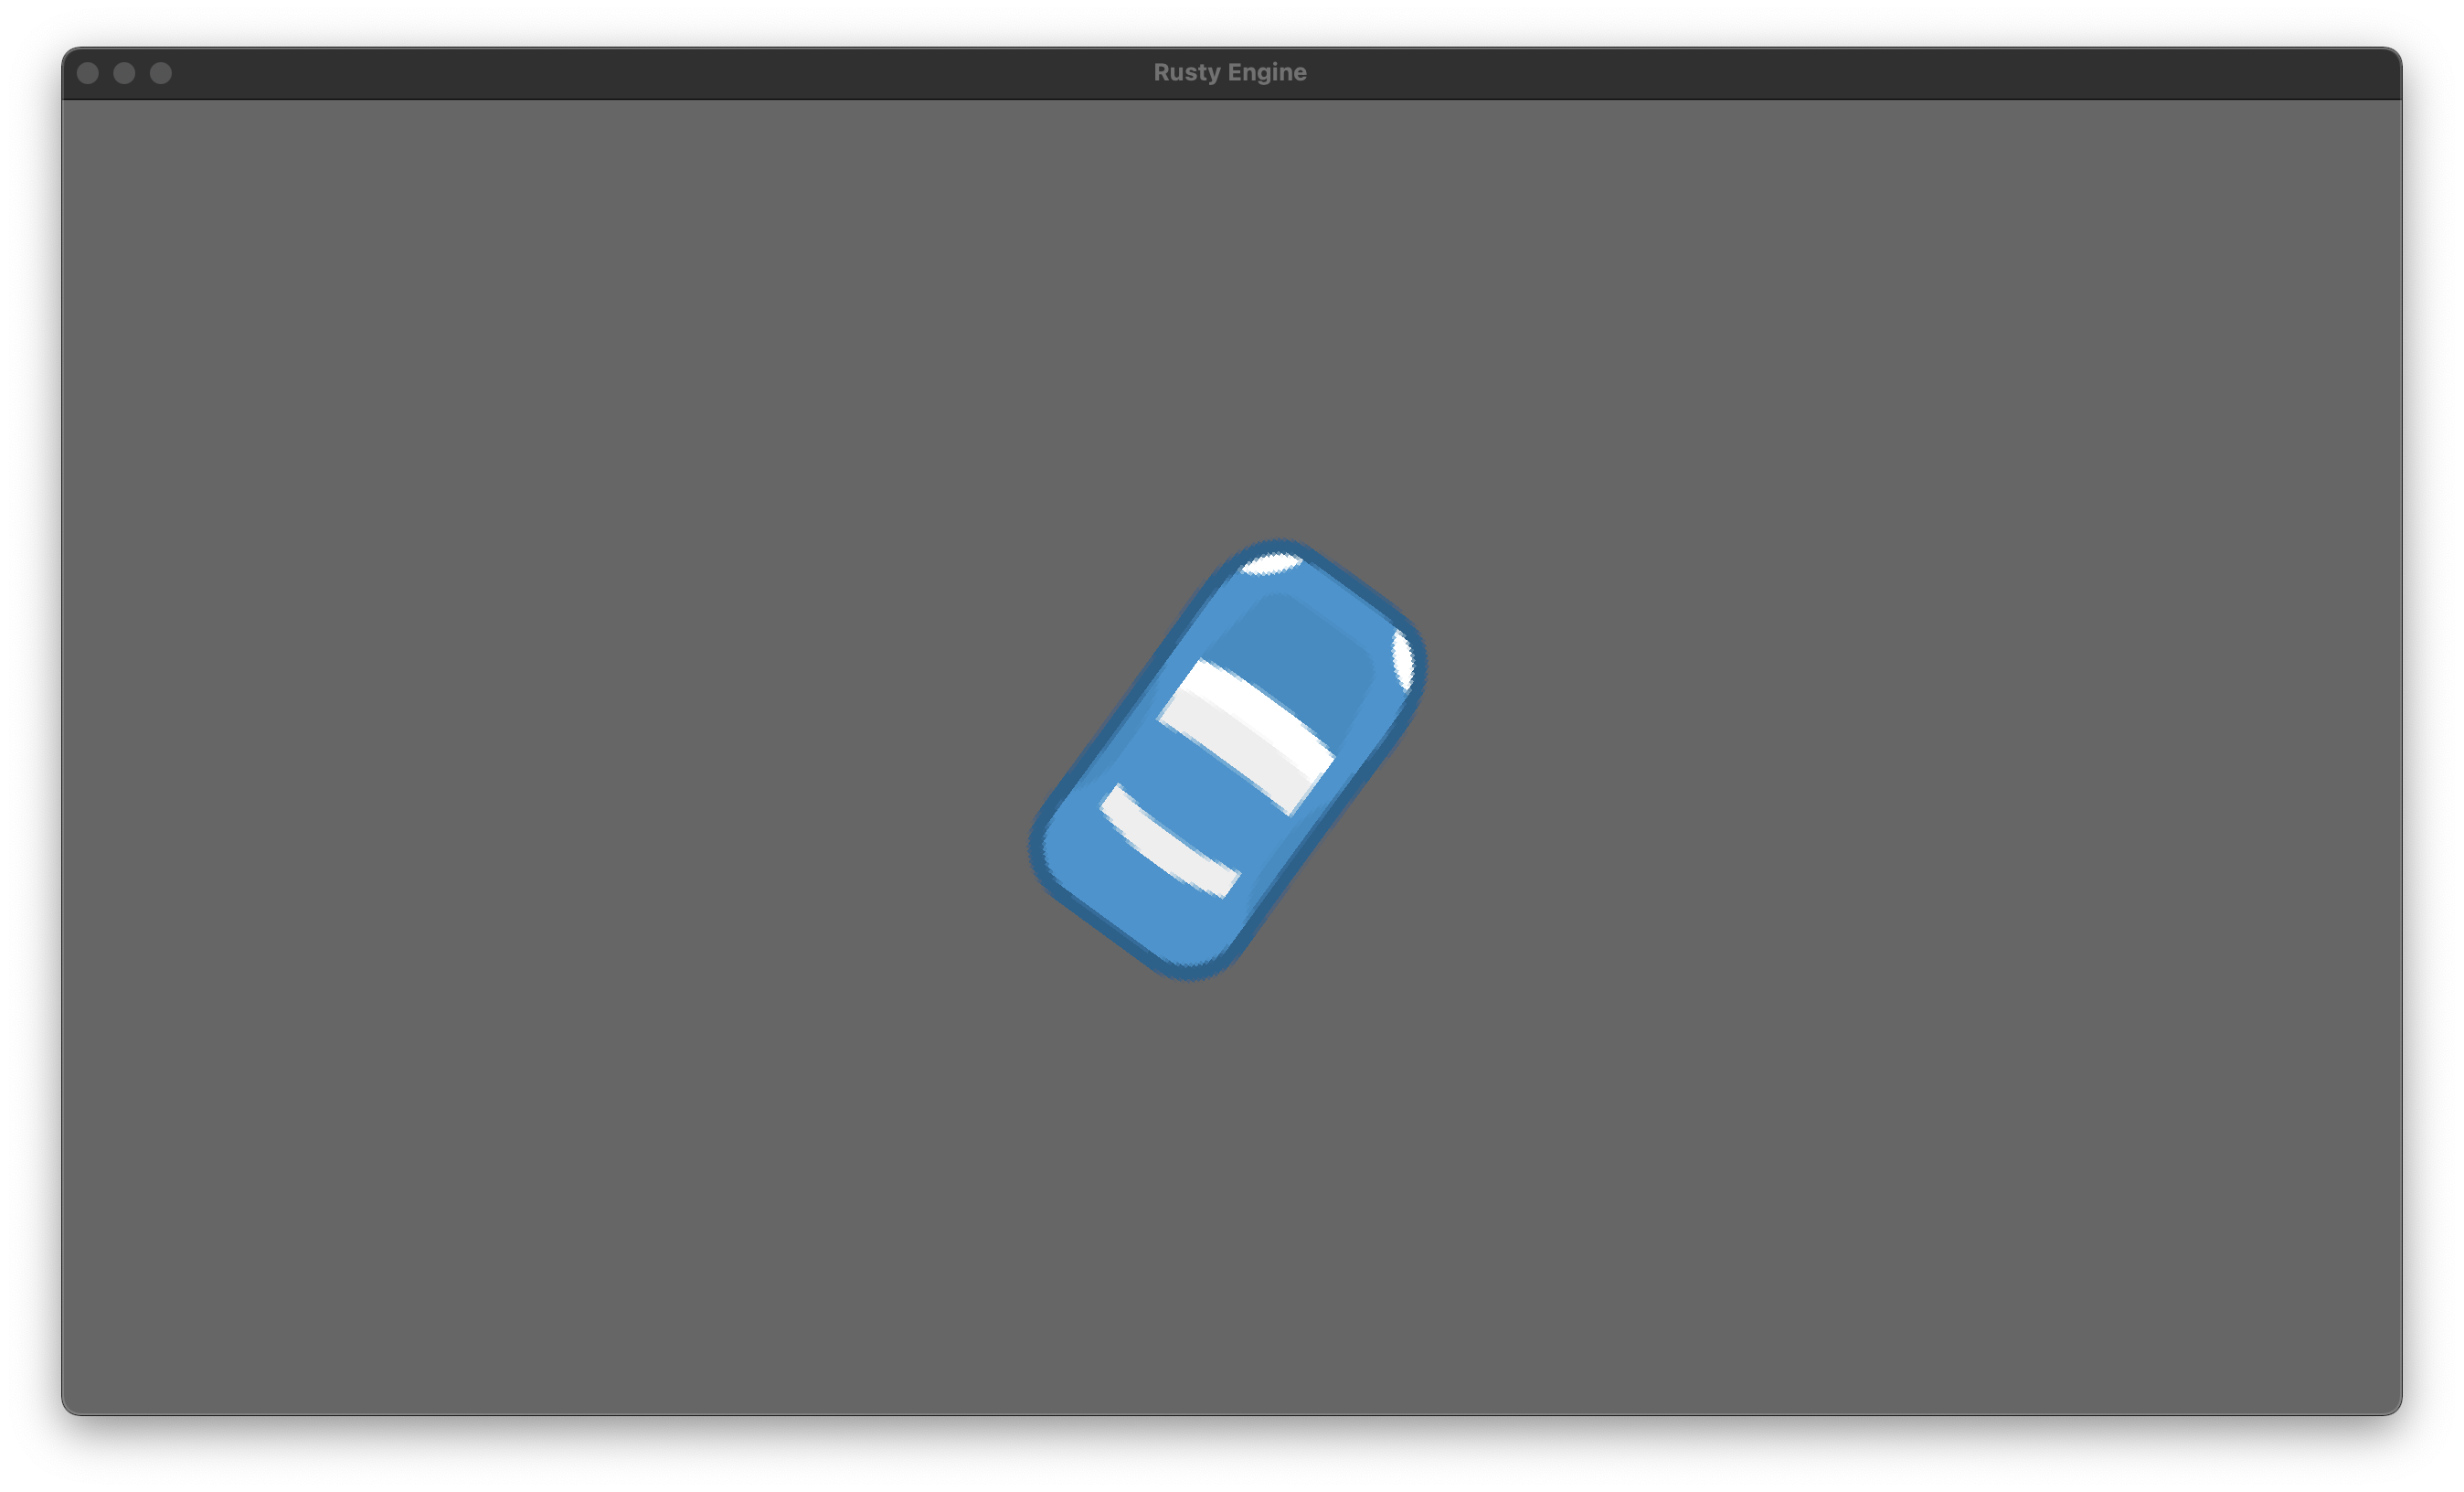
let sprite = game.add_sprite("player", SpritePreset::RacingCarBlue);
sprite.scale = 2.0;
// Start some music!
game.audio_manager.play_music(MusicPreset::Classy8Bit, 1.0);
// Add one or more functions with logic for your game. When the game is run, the logic
// functions will run in the order they were added.
game.add_logic(game_logic);
// Run the game, with an initial state
game.run(GameState { health: 100 });
}
// Your game logic functions can be named anything, but the first parameter is always a
// `&mut Engine`, and the second parameter is a mutable reference to your custom game
// state struct (`&mut GameState` in this case). The function returns a `bool`.
//
// This function will be run once each frame.
fn game_logic(engine: &mut Engine, game_state: &mut GameState) {
// The `Engine` contains all sorts of built-in goodies.
// Get access to the player sprite...
let player = engine.sprites.get_mut("player").unwrap();
// Rotate the player...
player.rotation += std::f32::consts::PI * engine.delta_f32;
// Damage the player if it is out of bounds...
if player.translation.x > 100.0 {
game_state.health -= 1;
}
}- Run your game with
cargo run --release. Don’t forget the--release!
Configuration
- Create a new Rust project
- Do
cargo add rusty_engineto add the latest version of Rusty Engine to the[dependencies]section of yourCargo.toml. It should add a line that looks something like this:
# In your [dependencies] section of Cargo.toml
rusty_engine = "7.0.0"
(Optional) Make dev profile act like release
If you don’t want to have remember to constantly add --release to your cargo build and cargo run commands, you can add this config section to your Cargo.toml to make your dev profile act like the release profile:
[profile.dev]
opt-level = 3
debug = false
debug-assertions = false
overflow-checks = false
incremental = false
codegen-units = 16
Asset Pack
Rusty Engine assumes the asset pack is present, so you MUST download the asset pack.
Here are three different ways to download the assets (pick any of them–it should end up the same in the end):
- RECOMMENDED: In your terminal with a posix-compatible shell, run this command inside your project directory:
curl -L https://github.com/CleanCut/rusty_engine/archive/refs/heads/main.tar.gz | tar -zxv --strip-components=1 rusty_engine-main/assets
- OR, clone the
rusty_enginerepository and copy/move theassets/directory over to your own project - OR, download a zip file or tarball of the
rusty_enginerepository, extract it, and copy/move theassets/directory over to your own project.
Asset Directory Structure
All assets reside inside an assets/ directory at the top folder of your Rust project (in the same directory as Cargo.toml).
The structure looks like this:
assets
├── audio
│   ├── music
│   └── sfx
├── fonts
└── sprite
    ├── racing
    └── rolling
You can organize your own custom files inside the assets folder wherever you like, but the provided asset pack is organized like this:
- Audio files in
assets/audio. The asset pack divides sounds intomusicandsfxsubdirectories. - Font files in
assets/font. - Sprites (images and colliders) in
assets/sprite.
Engine Initialization
Rusty Engine has a prelude which you should import in main.rs:
use rusty_engine::prelude::*;You must define a GameState struct (which we’ll go over in the game state section). This will be a struct that you store your game-specific data. Things like high score, player name, health left, etc. You must put the line #[derive(Resource)] above your struct definition.
use rusty_engine::prelude::*;

#[derive(Resource)]
struct GameState {
    health_left: i32,
}

fn main() {
    // ...
}
Create a new Game struct in your main function and assign it to a mutable variable, usually called game.
fn main() {
    let mut game = Game::new();
    // ...
Use your Game instance to set up your game and register logic functions to run each frame.
At the end of main you will run your game with Game::run(). The run method takes an initial game state, so provide an instance of your GameState struct:
fn main() {
    // ...
    game.run(GameState { health_left: 42 });
}
If you didn’t define any fields for your GameState struct (like above, we had a health_left field), the syntax looks like this:
fn main() {
    // ...
    game.run(GameState {});
}
Example
If you put it all together, it looks like this. This example will run and create an empty window, but won’t do anything, yet.
use rusty_engine::prelude::*;

#[derive(Resource)]
struct GameState {
    health_left: i32,
}

fn main() {
    let mut game = Game::new();

    // get your game stuff ready here

    game.run(GameState { health_left: 42 });
}
Game State
You will need somewhere to store data for your game between frames. That somewhere is your game state struct. You provide a struct to use for your own game state. Within that struct, you can store just about anything. Some examples of things you may want to put in your game state:
- Player attributes (name, color, health, energy, money, etc.)
- Game attributes (score, day, turn, etc.)
- Timers for animation, spawning events, etc.
- Collections of sprite labels to iterate through (perhaps a vector of labels of all the enemy sprites, or a vector of widgets to animate, or…whatever)
- Collections of text labels to iterate through and update (maybe text representing current health is placed above your player)
- Anything else that needs to persist across frames that isn’t already stored in the engine
You can name your game state struct whatever you want, but since there can only ever be one game state type, it probably makes sense just to name it GameState as we will in this tutorial.
You must always include the line #[derive(Resource)] immediately before the GameState. This is a requirement from the Bevy game engine which we’re using under-the-hood.
Here is an example of a game state you might define for a simple game which keeps track of a current score and a high score, the labels of enemies which need to move around, and a timer for when to spawn a new enemy.
#[derive(Resource)]
struct GameState {
    current_score: u32,
    high_score: u32,
    enemy_labels: Vec<String>,
    spawn_timer: Timer,
}
When you start your game, you will need to pass it an initial value of the game state. You will receive a mutable reference to this game state value in your game logic function each frame.
fn main() {
    // ...
    let game_state = GameState {
        current_score: 0,
        high_score: 2345,
        enemy_labels: Vec::new(),
        spawn_timer: Timer::from_seconds(10.0, TimerMode::Once),
    };
    game.run(game_state);
}
Game Logic Function
A game is divided up into frames. A frame is one run through your game logic to produce a new image to display on the screen. On most hardware you will usually get about 60 frames each second. Rusty Engine tries to run your game logic function once each frame.
A game logic function definition looks like this:
fn game_logic(engine: &mut Engine, game_state: &mut GameState) {
    // your actual game logic goes here
}
The function may be named anything you want, but we’ll always use game_logic in this tutorial. However, if you use more than one game logic function, each will need to have a unique name.
You need to “add” your game logic function to Rusty Engine by calling Game::add_logic in your main function BEFORE running the game with the run method:
game.add_logic(game_logic);You can add multiple game logic functions, which will always run in the order they were added. For example, this game will always run the menu_logic function first, and then the game_logic. Most people just use a single game logic function.
game.add_logic(menu_logic);
game.add_logic(game_logic);
Example
Here’s an example game logic function using the game state from the game state section. The game logic function increments the score and outputs that score to the console once per frame.
use rusty_engine::prelude::*;

#[derive(Resource)]
struct GameState {
    current_score: u32,
    high_score: u32,
    enemy_labels: Vec<String>,
    spawn_timer: Timer,
}

fn main() {
    let mut game = Game::new();
    let game_state = GameState {
        current_score: 0,
        high_score: 2345,
        enemy_labels: Vec::new(),
        spawn_timer: Timer::from_seconds(10.0, TimerMode::Once),
    };
    game.add_logic(game_logic); // Don't forget to add the logic function to the game!
    game.run(game_state);
}

fn game_logic(engine: &mut Engine, game_state: &mut GameState) {
    game_state.current_score += 1;
    println!("Current score: {}", game_state.current_score);
}
Sprite
A sprite in Rusty Engine is a 2D image, how it is placed on the screen (translation, rotation, scale, and layer), its collider, and other associated metadata. You will use sprites for all the graphics in your game. Many sprites will represent some thing. For example, a race car sprite may represent your player character in your game.

A barrel sprite may represent an obstacle, an enemy, or maybe it’s just part of the background. It’s up to you to decide how to treat the sprites.

Sprite Creation
Sprites are created through the Engine. Since Game implements DerefMut<Engine>, you can also call all of Engine’s creation methods through Game in your main() function. In either case, it looks something like this when you create a sprite with a preset:
#![allow(unused)]
fn main() {
// Through your `Game` in `main()`
let _ = game.add_sprite("my_player", SpritePreset::RacingCarBlue);

// Or later in a game logic function
let _ = engine.add_sprite("my_player", SpritePreset::RacingCarBlue);
}
All sprites in the asset pack have a “preset”, which is just a fancy enum that makes it easy for you as a user to select one of sprite image files that are included in the default assets pack. You could also specify the image filepath, relative to the assets/ directory, which you would do if you add your own images. For example, the full filepath of the blue racing car is assets/sprite/racing/car_blue.png, so to create it by filepath you would do:
#![allow(unused)]
fn main() {
let _ = engine.add_sprite("my_player", "sprite/racing/car_blue.png");
}
add_sprite returns a mutable reference to a Sprite (&mut Sprite). Since it will emit a warning to silently ignore the reference, you should explicitly ignore it if you are not going to use it by doing let _ = ... as in the examples above. However, most of the time you will want to use the mutable reference to immediately adjust your sprite.
Sprite Placement
There are four different fields you can use to position and size your sprite:
Translation
Sprite.translation is a Vec2 containing the X and Y coordinates of your sprite’s position on the screen. The coordinate system works just like it does in math class. (0.0, 0.0) is in the center of the screen. Positive X goes to the right side of the screen. Positive Y goes to the top of the screen. Every increment of 1.0 is one logical pixel on the screen. Hi-DPI screens may have more than one physical pixel per logical pixel. See the Engine section for details on how to check the logical pixel dimensions of your window.
Rotation
Sprite.rotation is an f32 representing the angle in radians from the positive X axis. In other words, a rotation of 0.0 is facing to the right, so custom images you want to use in Rusty Engine should also be “facing” to the right in their raw form (whatever “to the right” means is up to you). 2 * PI brings you in a full circle, so 0.5 * PI is “up”, PI is “left”, and 1.5 * PI is “down”. There are a bunch of helpful constants defined for cardinal directions if you don’t want to remember the numerical value yourself. These constants are all included in the prelude.
UP
DOWN
LEFT
RIGHT

NORTH
NORTH_EAST
EAST
SOUTH_EAST
SOUTH
SOUTH_WEST
WEST
NORTH_WEST
Scale
Sprite.scale is an f32. 1.0 is the default, which means matching a pixel of the source image to a pixel on the screen. 2.0 makes the image twice as wide and tall, etc.
Layer
Sprite.layer is an f32 that affects what sprite or text is “on top” of another sprite or text when they overlap. 0.0 is the default layer and is on the “bottom”, while 999.0 is the “top” layer. The order of sprites or text on the same layer is random and unstable (can change frame to frame), so you should make sure that sprites and text that will overlap are on different layers so they don’t change their position unpredictably. A good practice is to choose a few layers and assign them to constants, and then don’t let sprites on the same layer overlap. For example:
#![allow(unused)]
fn main() {
const BACKGROUND_LAYER: f32 = 0.0;
const CHARACTER_LAYER: f32 = 1.0;
const EFFECTS_LAYER: f32 = 2.0;
const UI_BOTTOM_LAYER: f32 = 3.0;
const UI_TOP_LAYER: f32 = 4.0;
}
Adjusting your newly-created sprite
When you create a sprite, you get a mutable reference to the newly-created sprite that you can use to adjust it.
#![allow(unused)]
fn main() {
let player = engine.add_sprite("my_player", SpritePreset::RacingCarBlue);
player.translation = Vec2::new(200.0, 100.0); // Move the car up and to the right
player.rotation = UP; // UP is one of the built-in constants you can use
player.scale = 2.5; // It's a BIG car!
player.layer = CHARACTER_LAYER; // as in previous code snippet
}
The Vec2 type used for the translation field is from glam, and has its own documentation you can read up on if you’re interested. The thing you’ll probably use the most are its x and y fields:
#![allow(unused)]
fn main() {
player.translation.x += 45.0 * engine.delta_f32;
player.translation.y -= 10.0 * engine.delta_f32;
}
NOTE: If you want to adjust your sprite smoothly, you will need to multiply it by the frame’s delta value. See the Engine section for more details.
Adjusting an existing sprite
To adjust a sprite which already exists, you need to get a mutable reference to it. This is where that “label” comes in. The sprites field on the Engine struct is a hash map of labels to sprites. You get a mutable reference to a sprite with the HashMap::get_mut method:
#![allow(unused)]
fn main() {
// Be careful with unwrap()! If the entry isn't there, this will crash your game.
let player_reference = engine.sprites.get_mut("my_player").unwrap();
player_reference.rotation += TURN_SPEED_PER_SEC * engine.delta_f32;
}
Deleting a sprite
To delete a sprite, remove it from the Engine.sprites hash map.
#![allow(unused)]
fn main() {
engine.sprites.remove("my_player");
}
Sprite Collisions
Rusty Engine has a basic system for detecting collisions between sprites. When two sprites with collision enabled begin or end overlapping, a CollisionEvent will be produced. By default, collisions are disabled on sprites, so you need to set the sprite’s collision field to true if you want it to emit CollisionEvents.
Processing collision events
Your game logic should process collision events each frame. Collision events which you don’t handle are discarded at the end of each frame. Collision events are accessed through the Engine.collision_events vector.
Each CollisionEvent consists of a CollisionState (an enum with Begin and End variants) and a CollisionPair, which is a tuple of the labels of the two sprites involved in the collision. It is up to you to figure out what to do with the information that a collision occurred.
#![allow(unused)]
fn main() {
for event in engine.collision_events.drain(..) {
    match event.state {
        CollisionState::Begin => {
            println!("{} and {} collided!", event.pair.0, event.pair.1);
        }
        CollisionState::End => {
            println!("{} and {} are no longer colliding.", event.pair.0, event.pair.1);
        }
    }
}
}
Colliders
Colliders are convex polygons that are used to detect if a collision has occurred between two sprites. Colliders will be rendered as polygons with white lines on the screen if Engine.show_colliders is set to true.
Colliders are stored in the same directory as the images they are for, and the collider files use the same filename as the image file the sprite uses, but with a .collider extension. If a valid collider file exists, it will be loaded automatically.
Creating colliders
All of the sprite presets in the game already have colliders, so you only have to set the collision field to true for sprite presets and you’re ready to go.
If you create a new sprite using your own image, and you want it to produce CollisionEvents, then you need to create a collider for that sprite.
Creating colliders from scratch is quite tedius, so there is an “example” program called collider that you can use to create a collider! To install and use collider, do the following:
# Install the collider example (you only need to do this once)
$ cargo install rusty_engine --example collider

# Inside your project, run the collider example and pass it the path to your image file.
$ collider assets/db.png
Then follow the example’s console instructions to create (or re-create) a collider and write it to a file.
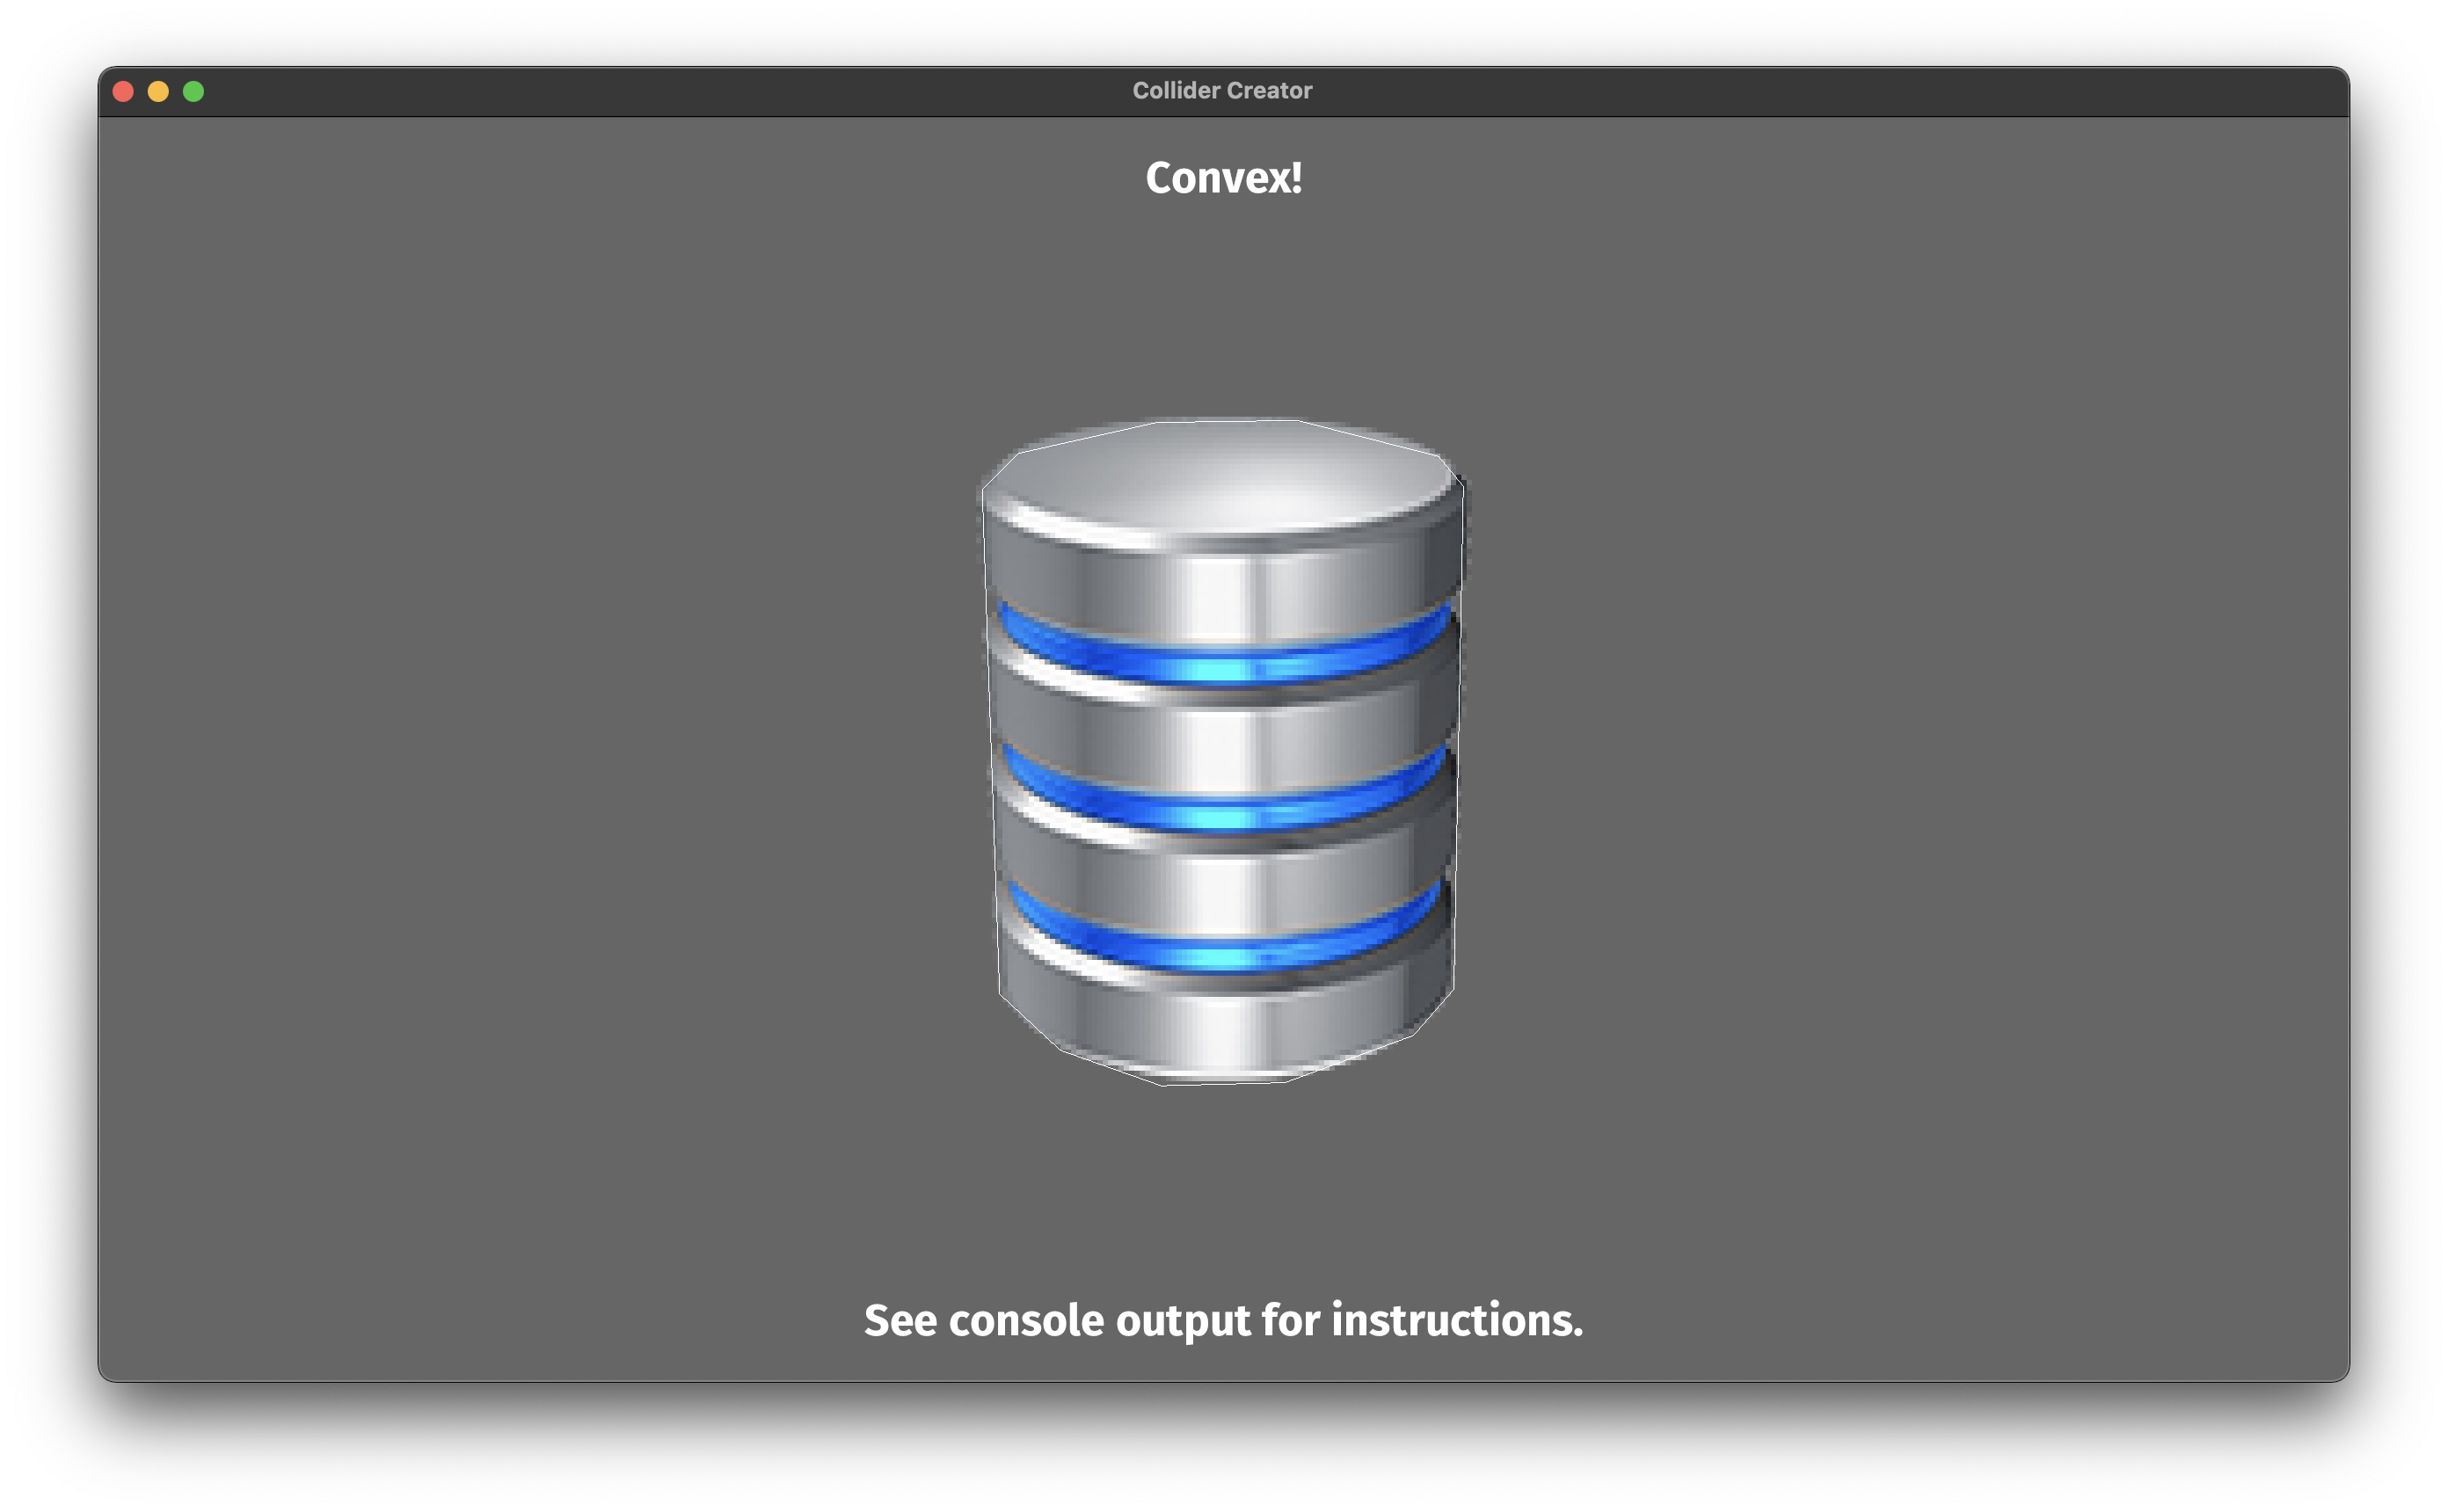
Once you have created the collider, add the sprite to your game and set the collision field to true!
Input
For games to be interactive, you need to process input from the user! Rusty Engine handles keyboard and mouse input.
Keyboard State
You can think of keyboard state as a snapshot of exactly which keys are pressed (or not) at the start of the frame. Keyboard state is best for interactive things like character movement. If you need to process every single keystroke (like when entering text), check out the Keyboard Event section instead.
The Engine struct’s keyboard_state field is a struct through which you query the state of the key(s) you are interested in.
Rusty Engine exposes Bevy’s KeyCode enum through its prelude. See the KeyCode documentation for all the possible key variants.
Pressed / Released
Use the pressed method see if a single key is currently pressed or not:
#![allow(unused)]
fn main() {
if engine.keyboard_state.pressed(KeyCode::Enter) {
    // do stuff every frame that the key is still pressed
}
}
If a key is not pressed, then it is released, so there is no dedicated method to check if a key is released. Just negate the condition by putting a ! before the method call.
Just Pressed / Just Released
The just_pressed method will let you know if the key was pressed for the first time this frame, which is useful for triggering actions that you only want to happen once per keypress.
#![allow(unused)]
fn main() {
if engine.keyboard_state.just_pressed(KeyCode::Escape) {
    // do a thing when the key has just been pressed
}
}
Since “just pressed” and “just released” are not logical opposites, there is also a just_released method. This returns true if the key was previously in a pressed state and was just released this frame.
#![allow(unused)]
fn main() {
if engine.keyboard_state.just_released(KeyCode::KeyW) {
    // do a thing when the key has just been released
}
}
Handling Multiple Keys
There is an *_any method for each of the three single key methods that does the same thing, but considering multiple keys at a time. This is especially helpful if you want to, e.g. treat WASD and arrow keys identically.
pressed->pressed_anyjust_pressed->just_pressed_anyjust_released->just_released_any
Instead of passing a single KeyCode to these methods, you pass a slice containing all of the key codes you care about:
#![allow(unused)]
fn main() {
if engine.keyboard_state.pressed_any(&[KeyCode::KeyW, KeyCode::ArrowUp]) {
    // player moves upward
}
if engine.keyboard_state.just_pressed_any(&[KeyCode::KeyQ, KeyCode::F1]) {
    // open menu
}
if engine.keyboard_state.just_released_any(&[KeyCode::Space, KeyCode::ControlLeft]) {
    // re-evaluate your life choices
}
}
Keyboard Events
Keyboard events are what your operating system passes to text input boxes. If you go to a text box in a browser and hold down the space bar, you’ll typically see one space, a short pause, and then several spaces come out faster after that. Those are keyboard events. You typically only want keyboard events if you are trying to capture sequences of keypresses as if they are text. For things like character movement and button presses where you only care about the final state of the keyboard each frame, you should check out the Keyboard State section instead.
Keyboard events are passed through from Bevy as instances of the KeyboardInput struct. Here is an example of processing keyboard events to adjust the position of a sprite:
#![allow(unused)]
fn main() {
for keyboard_event in engine.keyboard_events.drain(..) {
    // We're using `if let` and a pattern to destructure the KeyboardInput struct and only look at
    // keyboard input if the state is "Pressed". Then we match on the KeyCode and take action.
    if let KeyboardInput {
        key_code,
        state: ButtonState::Pressed,
        ..
    } = keyboard_event
    {
        match key_code {
            KeyCode::KeyW | KeyCode::ArrowUp => race_car.translation.y += 10.0,
            KeyCode::KeyA | KeyCode::ArrowLeft => race_car.translation.x -= 10.0,
            KeyCode::KeyS | KeyCode::ArrowDown => race_car.translation.y -= 10.0,
            KeyCode::KeyD | KeyCode::ArrowRight => race_car.translation.x += 10.0,
            _ => {}
        }
    }
}
}
Mouse State
Everything said about the Keyboard State is true for Mouse State as well, just for your mouse instead of your keyboard. Mouse state is perfect for character movement or game controls such as buttons. If you need to process every bit of mouse input, such as all the locations the mouse was at since the beginning of the last frame, then you’ll need to look at Mouse Events instead.
All mouse state is stored in the Engine struct’s mouse_state field, and queried via methods.
Mouse Buttons
Mouse button handling closely parallels keyboard state handling, with the same six methods. Only instead of accepting KeyCode variants, they accept MouseButton variants.
pressed->pressed_anyjust_pressed->just_pressed_anyjust_released->just_released_any
Rather than repeat the entire discussion for each of the six methods, here’s a quick example covering them all:
#![allow(unused)]
fn main() {
if engine.mouse_state.pressed(MouseButton::Left) {
    // The left mousebutton is currently pressed -- process some continuous movement
}
if engine.mouse_state.just_pressed(MouseButton::Right) {
    // click that button!
}
if engine.mouse_state.just_released(MouseButton::Right) {
    // nope, unclick the button.
}
if engine.mouse_state.pressed_any(&[MouseButton::Left, MouseButton::Right]) {
    // one or more of the main mouse buttons are currently pressed
}
if engine.mouse_state.just_pressed_any(&[MouseButton::Middle, MouseButton::Other(4)]) {
    // the middle button or the 4th button (or both) was just pressed
}
if engine.mouse_state.just_released_any(&[MouseButton::Left, MouseButton::Middle]) {
    // one of those buttons was just released
}
}
Location
Use the location method to see where the mouse is. It returns an Option<Vec2>. If None is returned, then either the window isn’t focused or the mouse pointer isn’t in the window. If present, the Vec2 value is in the same 2D world coordinate system as the rest of the game. See the section on sprite translation for more info about Vec2 or the world coordinate system.
A fun way to demonstrate mouse location is by having a sprite appear wherever your mouse is located:
#![allow(unused)]
fn main() {
// `player` is a sprite
if let Some(location) = engine.mouse_state.location() {
    player.translation = location;
}
}
Motion
The relative motion that the mouse moved last frame is accumulated into a single Vec2. This could be useful if you want to base some logic on how fast or in which direction the mouse is moving.
#![allow(unused)]
fn main() {
let motion = engine.mouse_state.motion();
if motion.length() > 50.0 {
    // mouse is moving pretty fast
}
}
Mouse Wheel
This represents both the final scrolling (vertical, y) state of the mouse wheel and the final tilt (horizontal, x) state of the mouse wheel. See the MouseWheelState docs for more info on that.
#![allow(unused)]
fn main() {
let mouse_wheel_state = engine.mouse_state.wheel();
if mouse_wheel_state.y > 0.0 {
    // scrolling in one direction...
}
}
Mouse Events
Every movement of the mouse, click of a mouse button, or scrolling tick of a scroll wheel generates a mouse event. All of the mouse events are stored into a set of vectors on Engine that can be examined. At the end of each frame, any unprocessed events are thrown away.
Mouse events are most useful when you want to process multiple events that happened within a single frame, such as processing all of the points that a mouse traversed, or all of the mousewheel clicks that happened in a single frame.
Mouse button events
You usually want to use mouse state for mouse buttons, which are less awkward to deal with than mouse events when you only care about the state the mouse ended up in at the end of the frame. Mouse events are available in the Engine struct’s mouse_button_events field, which is a vector of mouse button input events. The Bevy struct MouseButtonInput is used for the event value. Here is an example of using mouse button events to rotate a sprite by a fixed amount for each click. This is guaranteed not to miss any clicks in the (unlikely) event that two clicks come in on the same frame.
#![allow(unused)]
fn main() {
for mouse_button_input in &engine.mouse_button_events {
    if mouse_button_input.state != ButtonState::Pressed {
        break;
    }
    match mouse_button_input.button {
        MouseButton::Left => sprite.rotation += std::f32::consts::FRAC_PI_4,
        MouseButton::Right => sprite.rotation -= std::f32::consts::FRAC_PI_4,
        _ => {}
    }
}
}
Mouse location events
Mouse location events are most useful if you are trying to capture all the points the mouse was at during the frame. Unlike mouse button events, there are often multiple mouse location events, since moving the mouse produces a series of events for each location that the mouse cursor is rendered on screen. If you only care about the final location of the mouse during the frame, you should use mouse state instead.
Mouse location events are accessed through the Engine.mouse_location_events vector and contain the CursorMoved struct re-exported from Bevy. If you want to draw a trail of sparkles wherever a mouse went, mouse location events might be a good source of data:
#![allow(unused)]
fn main() {
for cursor_moved in &engine.mouse_location_events {
    // draw sparkles at cursor_moved.position
}
}
Mouse motion events
Each location event has a corresponding motion event which reports the relative motion of the mouse, rather than the absolute location. Mouse motion events are accessed through the Engine.mouse_motion_events vector and contain the MouseMotion struct re-exported from Bevy.
#![allow(unused)]
fn main() {
for mouse_motion in &engine.mouse_motion_events {
    // do something with mouse_motion.delta
}
}
Mouse wheel events
As the mouse wheel tends to produce multiple events in a single frame, mouse wheel events may tend to be more useful than the mouse wheel state. Mouse wheel events are accessed through the Engine.mouse_wheel_events vector and contain the MouseWheel struct re-exported from Bevy. Here’s an example of using the mouse wheel to scale the size of a sprite up or down. The y field represents the turning of the wheel. The x field represents sideways tilting motion for mouse wheels that support it.
#![allow(unused)]
fn main() {
for mouse_wheel in &engine.mouse_wheel_events {
    sprite.scale *= 1.0 + (0.05 * mouse_wheel.y);
}
}
Text
Text in Rusty Engine is a lot like sprites. It has the same set of translation, rotation, scale, and layer fields. It is placed using the same world coordinate system as sprites. (Indeed, Rusty Engine went to great pains to use the same coordinate system for everything: rather than having separate coordinate systems for world and screen space, there is only world space.) Only instead of being based on a rectangular image file, text is based on a string value combined with a font and font size which are used to generate an image at runtime.
Text Creation
Text creation is quite similar to sprite creation. You create text through the Engine.add_text method. Since Game implements DerefMut<Engine>, you can also call all of Engine’s creation methods through Game in your main() function. In either case, it looks something like this when you create text:
#![allow(unused)]
fn main() {
// Through your `Game` in `main()`
let _ = game.add_text("title", "The Fun Game");

// Or later in a game logic function through the `Engine`
let _ = engine.add_text("score", "Score: 0");
}
The first parameter is a unique label. It is used in the same way as sprite labels are used (to identify the text later on). The second parameter is the string value to render.
add_text returns a mutable reference to a Text (&mut Text). Note that this is one case where Rusty Engine does not re-export something from Bevy. Bevy has also has a struct named Text, but it is entirely a different thing which Rusty Engine does not expose to you.
Since it will emit a warning to silently ignore the mutable reference to the Text, you should explicitly ignore it if you are not going to use it by doing let _ = ... as in the examples above. However, most of the time you will want to use the mutable reference to immediately adjust your text, as we’ll see in the following sections.
Text Value, Font & Font Size
Changing the string value, the chosen font, or the font size causes the Text to be re-rendered as a new image at the end of the frame. This is relatively expensive in terms of performance, so you should avoid changing these attributes except when you actually need to.
All existing text values can be accessed through the Engine struct’s texts field, which is a vector of Texts.
Value
The Text struct’s value field is the actual string that gets rendered to the screen. If you change the value, then the Text will be re-rendered as a new image at the end of the frame with the new value.
#![allow(unused)]
fn main() {
let score_text = engine.texts.get_mut("score_text").unwrap();
score_text.value = format!("Score: {}", score); // The `format` macro produces a String.
}
Font
If you change the font, then the Text will be re-rendered as a new image at the end of the frame with the new value.
The asset pack contains two fonts:
font/FiraMono-Medium.ttffont/FiraSans-Bold.ttf(the default font if none is specified)
#![allow(unused)]
fn main() {
let mono = engine.add_text("mono", "This text is using a monospace font");
mono.font = "font/FiraMono-Medium.ttf".to_string();
}
To use a custom font, place a valid otf or ttf file in assets/ and set it on your Text.
#![allow(unused)]
fn main() {
// After placing `party.otf` in the `assets/` directory...
let party = engine.add_text("party", "Let's Party!");
mono.font = "party.otf".to_string();
}
If you specify a font file which can’t be loaded successfully, you will get an console error like this:
Dec 30 15:15:20.624 WARN bevy_asset::asset_server: encountered an error while reading an asset: path not found: /Users/nathan/rust/rusty_engine/assets/font/nonexistent.ttf
Font Size
If you change the font size, then the Text will be re-rendered as a new image at the end of the frame with the font size.
The default font size is 30.0. Setting the font size doesn’t require a lot of explanation:
#![allow(unused)]
fn main() {
let large = engine.add_text("large", "This is a large font size!");
mono.font_size = 96.0;
}
Text Placement
Text is rendered as an image. This rendering (or re-rendering) happens at the end of the frame after any of the Value, Font & Font Size attributes are changed. However, when values such as translation, rotation, scale, or layer are changed, the image remains the same and its representation on screen is manipulated in the GPU, which is high performance.
In short, feel free to change your text’s placement attributes every frame without any big hit in performance.
Translation
Text.translation is a Vec2 containing the x and y coordinates of your text’s position on the screen. This Vec2 location is in the exact center of the text, both vertically and horizontally. In other words, text is always rendered with “centered” alignment on both axes.
The coordinate system works just like it does in math class. (0.0, 0.0) is in the center of the screen. Positive X goes to the right side of the screen. Positive Y goes to the top of the screen. Every increment of 1.0 is one logical pixel on the screen. Hi-DPI screens may have more than one physical pixel per logical pixel. See the Engine section for details on how to check the logical pixel dimensions of your window.
#![allow(unused)]
fn main() {
let score_text = game.add_text("score_text", "Score: 0");
score_text.translation = Vec2::new(400.0, -325.0);
}
Rotation
Text.rotation is an f32 representing the angle in radians from the positive X axis. In other words, a rotation of 0.0 results in normal, horizontal text along the X axis. A rotation of PI would result in upside-down text.
#![allow(unused)]
fn main() {
let angled = engine.add_text("angled", "This text is at an angle.");
score_text.rotation = std::f32::consts::PI / 4.0;
}
Scale
Text.scale is an f32. 1.0 means matching a pixel of the source image to a pixel on the screen. 2.0 makes the image twice as wide and tall, etc.
Usually, you will want to leave text at a scale of 1.0, but if you wish to have text zoom or shrink, modifying the scale has two important advantages compared to changing the font size:
- Changing the scale is fast. The text image does not need to be re-rendered, and the size change is handled all in GPU hardware.
- Changing the scale doesn’t cause weird re-rendering inconsistencies, so animating scale changes looks smooth.
The main drawback of changing the scale is that since the font is not re-rendered, it looks pixellated when scaled up. Though, this could be considered as a stylistic plus as well.
#![allow(unused)]
fn main() {
let zoomed = engine.add_text("zoomed", "This text is twice as big as normal.");
score_text.scale = 2.0;
}
Layer
Text.layer is an f32 that affects what sprite or text is “on top” of another sprite or text when they overlap. 0.0 is the default layer and is on “bottom”, and 999.0 is the “top” layer. The order of sprites or text on the same layer is random and unstable (can change frame to frame), so you should make sure that sprites and text that will overlap are on different layers. A good practice is to choose a few layers and assign them to constants. For example:
#![allow(unused)]
fn main() {
const BACKGROUND_LAYER: f32 = 0.0;
const CHARACTER_LAYER: f32 = 1.0;
const EFFECTS_LAYER: f32 = 2.0;
const UI_BOTTOM_LAYER: f32 = 3.0;
const UI_TOP_LAYER: f32 = 4.0;
}
Adjusting your newly-created text
When you create a Text, you get a mutable reference to the newly-created text that you can use to adjust it.
#![allow(unused)]
fn main() {
let text = engine.add_text("msg", "This is an important message.");
text.translation = Vec2::new(0.0, -300.0);
text.layer = UI_TOP_LAYER; // as in previous code snippet
}
The Vec2 type used for the translation field is from glam, and has its own documentation you can read up on if you’re interested. The thing you’ll probably use the most are its x and y fields. The code below is the same as setting text.translation = Vec2::new(0.0, -300.0);
#![allow(unused)]
fn main() {
text.translation.x = 0.0;
player.translation.y = -300.0;
}
NOTE: If you want to adjust your text’s placement smoothly, you will need to multiply your change by the frame’s delta value. See the Engine section for more details.
Adjusting an existing text
To adjust a text which already exists, you need to get a mutable reference to it. This is where that “label” comes in. The Engine.texts field is a hash map of labels to texts. You get a mutable reference to a text with the HashMap::get_mut method:
#![allow(unused)]
fn main() {
// Be careful with unwrap()! If the entry isn't there, this will crash your game.
let spinning_message = engine.texts.get_mut("spinning_message").unwrap();
spinning_message.rotation += TURN_SPEED_PER_SEC * engine.delta_f32;
}
Deleting a text
To delete a text, remove it from the Engine.texts hash map.
#![allow(unused)]
fn main() {
engine.texts.remove("old_message");
}
Audio
Rusty Engine has a basic audio system. You can play one looping music track, and quite a few concurrent sound effects. There are some music and sound effect files included in the asset pack which can be used via the MusicPreset and SfxPreset enums, respectively.
Supported audio file formats are ogg, mp3, flac, and wav.
All audio is accessed through methods on the audio manager accessed through Engine.audio_manager.
Music
One music file may be played at a time. Music always loops repeatedly until explicitly stopped (or the program exits). As with other Engine fields, the audio manager is also available through the Game struct in your main function.
Play
The play_music method starts playing looping music. The first parameter should be a MusicPreset enum variant or a music file path relative to assets/. All music from the asset pack have variants present in the MusicPreset enum for convenience.
The second parameter is the volume, which should be a value between 0.0 (silent) and 1.0 full volume.
#![allow(unused)]
fn main() {
// using a preset
game.audio_manager.play_music(MusicPreset::Classy8Bit, 1.0);

// using a filepath relative to `assets/`
game.audio_manager.play_music("music/Classy 8-Bit.ogg", 1.0);
}
Any music already playing will be stopped when play_music is called.
Stop
The stop_music method stops any music that is already playing.
#![allow(unused)]
fn main() {
engine.audio_manager.stop_music();
}
Music playing status
The music_playing method will return a bool indicating whether or not music is currently playing.
#![allow(unused)]
fn main() {
if engine.audio_manager.music_playing() {
    // yep, you remembered to start the music
}
}
Sound Effects
At least a dozen sound effects can play concurrently. The exact number is probably dependent on the particular hardware you have available on your local machine. Sound effects are played in a “fire and forget” manner, and will each play in a separate channel (if available) and terminate once reaching the end of the audio source.
Play
The play_sfx method plays a sound effect. The first parameter should be a SfxPreset enum variant or a music file path relative to assets/. All sound effects from the asset pack have variants present in the SfxPreset enum for convenience.
The second parameter is the volume, which should be a value between 0.0 (silent) and 1.0 full volume.
#![allow(unused)]
fn main() {
// using a preset
engine.audio_manager.play_sfx(SfxPreset::Jingle1, 1.0);

// using a filepath relative to `assets/`
engine.audio_manager.play_sfx("audio/sfx/jingle1.ogg", 1.0);
}
There is no way to interact with sound effects.
Timer
Rusty Engine re-export’s Bevy’s Timer struct. Please see the Timer API documentation for full details. Below, is a quick introduction to the most vital parts.
Timers are super cheap, performance-wise. Feel free to create them and throw them away as much as you like.
Creation
It is easy to create a timer with the from_seconds method. The first parameter is a number of seconds to countdown, and the second parameter is whether or not the timer is repeating. TimerMode::Once means the timer will only countdown once, and then remain at 0.0 once finished. TimerMode::Repeating means the timer will start counting down again from the same countdown time as soon as it has reached 0.0.
#![allow(unused)]
fn main() {
// A one-shot timer.
let timer_once = Timer::from_seconds(10.0, TimerMode::Once);

// A repeating timer.
let timer_repeating = Timer::from_seconds(3.0, TimerMode::Repeating);
}
Counting down & Finishing
Timers must be ticked with the tick method to make them actually count down the time. The tick method takes a Duration of time that has gone by, which is exactly what Engine.delta is for. tick returns an immutable reference to the timer, so you can chain a method call to finished or just_finished.
#![allow(unused)]
fn main() {
if timer_once.tick(engine.delta).just_finished() {
    // the one-shot timer just finished, do the thing
}

if timer_repeating.tick(engine.delta).just_finished() {
    // the repeating timer finished (again), do the thing (again)
    // the timer has already begun counting down from the top again at this point
}
}
If you don’t tick a timer, it is effectively paused.
Engine
The Engine struct is central to Rusty Engine and has already shown up in many places in this tutorial. It is highly recommended to read through all of the Engine API documentation.
Here are a few other tidbits that are worth calling out:
should_exit- aboolfield you can set totrueto cause Rusty Engine to cleanly exit at the end of the frame.delta- the duration of the previous frame as aDuration. This should be used for ticking anyTimers.delta_f32- the duration of the previous frame as anf32. This should be used to produce smooth animation. For example, if you define a movement speed inpixels per secondsuch asconst MOVE_SPEED: f32 = 50.0, then you can use it to actually move a sprite at that speed by multiplying it bydelta_f32like this:sprite.translation.x += MOVE_SPEED * engine.delta_f32time_since_startup- the duration since the start of the program as aDurationtime_since_startup_f64- the duration since the start of the program as anf64. This needs to be a 64-bit float because it would be easy for anf32to reach a number high enough to be low precision. If you want to do math with this number, you should do the math withf64’s, and then convert it to anf32at the very end.window_dimensions- aVec2describing the width and height of the window in pixels. Since(0.0, 0.0)is the center of the screen, the edges of the screen are +/-window_dimensions / 2.0.
…for the rest of the fields (and methods), see the Engine API documentation
Game
The Game struct exists to get your custom game state injected into Bevy, and to serve as a proxy for Engine before the game has started.
Since Game implements DerefMut<Engine>, any field or method not found on Game will be searched for on Engine and used if it is found. So, in a sense, Game is also the Engine while you are setting things up in main. However, there are a couple additional things that are unique to Game:
New
The first, and most obvious, difference is that Game has a new method, as documented in the Engine Initialization section. You need to call new in your main function to create a new game. The variable you assign this value to should be mutable.
fn main() {
    let mut game = Game::new();
}
Window Settings
Rusty Engine re-exports the Window struct from Bevy, whose fields are all used to request certain window attributes. Please be aware that these are only requests for configuration, and that the underlying operating system may refuse (or be unable) to give you exactly what you ask for. For example, you may not be able to obtain a window with larger dimensions than the physical monitor.
Pass a Window to the window_settings method to request specific settings for your game window. This is a great time to take advantage of “struct update” syntax so you don’t have to re-specify the fields which you aren’t customizing.
#![allow(unused)]
fn main() {
game.window_settings(Window {
    title: "My Awesome Game".into(),
    resolution: WindowResolution::new(800, 200),
    ..Default::default()
});
}
Adding Game Logic Functions
Game has an add_logic method to add game logic functions to your game. Please see the Engine Initialization for more details on this method.
Running the game
The last thing you will do in your main function is to call the run method to begin your game. The run method takes an instance of whatever game state struct you defined.